Having issues with Verify Vacuum of Vacuum Level Verification on UIC FlexJet Head Assembly 47541107 T47541107? Read our step-by-step SMT maintenance solution below. If you require replacement feeders, nozzles, or sensors, contact SMTBOX for OEM-compatible parts.
1. Select Machine Status > Diagnostics > Discrete I/O > Head
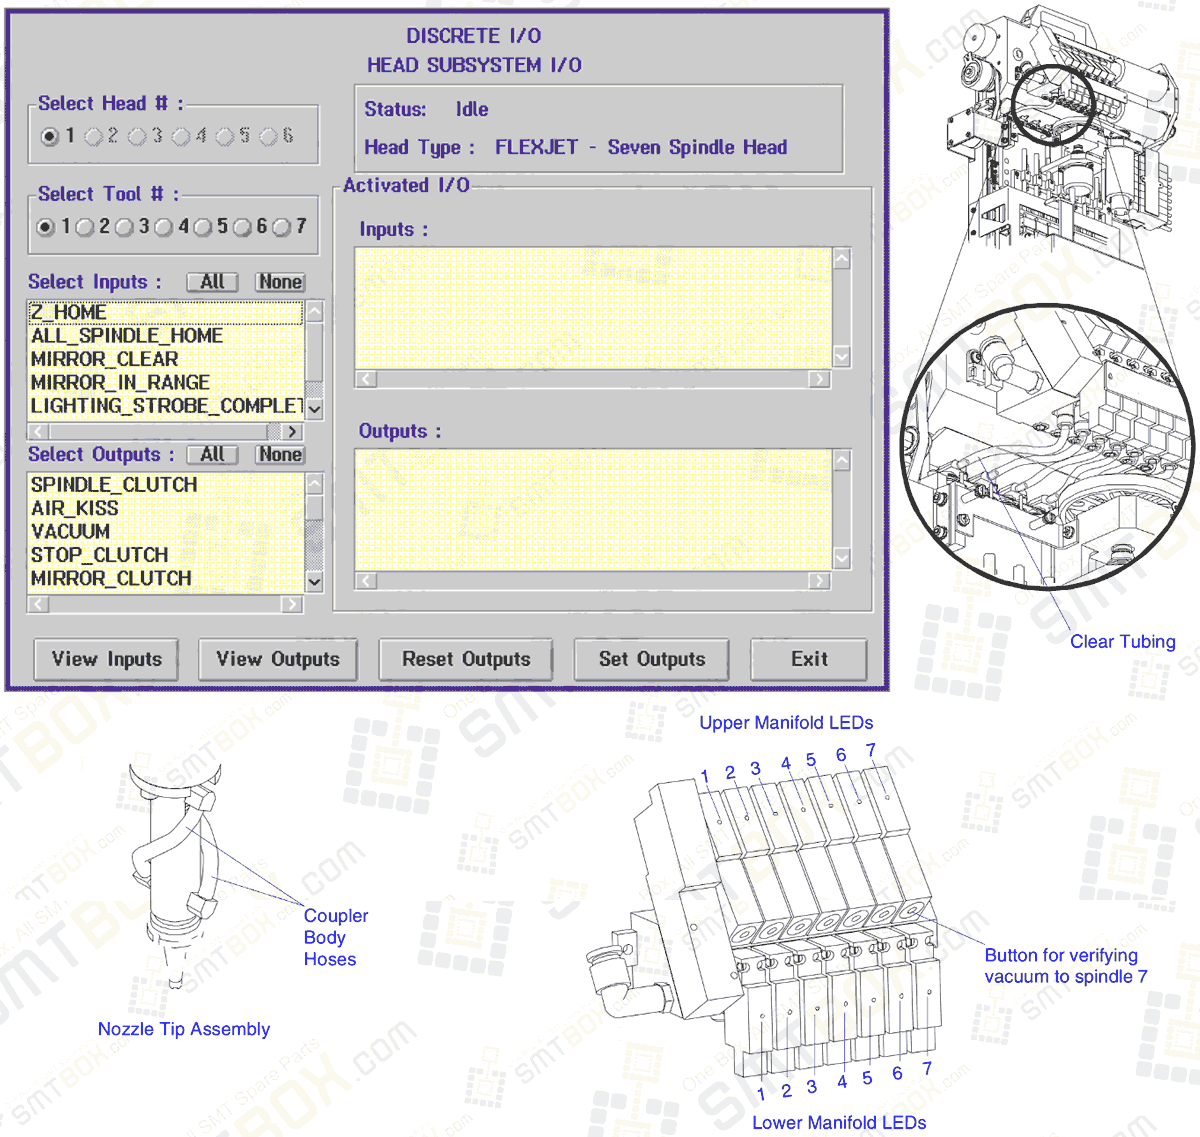
The Discrete I/O – Head Subsystem I/O dialog box displays.
2. Select the correct Head # (number) option button.
3. Perform the following procedure to turn vacuum on for all 7 spindles.
It is recommended to measure each spindle vacuum level with vacuum on all spindles simultaneously.
a. Select Tool > 1.
b. Select VACUUM and MAIN_VACUUM_CONTROL in the Select Outputs field.
c. Select the Set Outputs button.
d. Repeat steps 3a to 3c for the next tool. When vacuum is turned on for all 7 spindles, proceed to the next step.
4. Observe the vacuum gauge reading while manually rotating the Theta pulley 360 degrees. If the vacuum level is at least 20 inches Hg for a complete revolution, proceed to step 6. If the vacuum level is not at least 20 inches Hg for a complete revolution, proceed to the next step.
5. Perform the following procedure if the vacuum for a spindle is low.
a. Visually inspect the vacuum hose that routes from the Manifold to the top of the Spindle. Check for a kink, loose fitting, or physical damage. If physical damage is evident, replace the vacuum hose. If a fitting is loose, properly seat the fitting. See the illustration to the left.
b. Visually inspect the vacuum hoses on the Coupler Body Assembly for loose fittings or damage. Then properly seat the hose or replace if necessary. See the illustration below.
c. Check the upper section of the Manifold for the selected spindle. If the upper LED is on at the Manifold, but there is no vacuum, then manually push the button in front of the manifold. If vacuum appears when the button is pushed, the Manifold must be replaced. Refer to the illustration below.
6. Disconnect the vacuum gauge from the nozzle, then attach the gauge (and 10MPF nozzle if needed) to the next spindle and repeat this procedure from step 3 until all 7 spindles are verified.
7. Use the following procedure to turn off vacuum for all 7 spindles.
a. Select Tool > 1.
b. Verify that VACUUM and MAIN_VACUUM_CONTROL are highlighted in the Select Outputs field.
c. Select Reset Outputs.
d. Repeat steps 7a to 7c for the next Tool number. When vacuum is turned off for all 7 spindles, verify that none of the 7 upper manifold LEDs are on. If any of the LEDs are on, repeat from step 7a until all 7 LEDs are extinguished.
8. Select Exit
9. Install the FlexJet Head cover.
10. Install the nozzles previously removed using the Head/Changer Nozzle Setup window. Refer to the Installation/Removal of Nozzles section in the Nozzle Tip Assembly module.
11. Select System Status > Machine > Configuration and select the head icon to verify the nozzle configuration.
12. Palm down to raise the spindles.
13. Install the safety cover below the hinged cover.
14. Record on the appropriate copied sheet from the Maintenance Log document that this procedure was performed and include the date.
Note:
It is important to check the vacuum reading while rotating the Theta pulley 360 degrees because it is possible for vacuum to vary depending on the Theta angle.
Our editorial team consists of senior SREs, mechanical engineers, and SMT assembly specialists with over 15 years of industry experience in PCB assembly line optimization. All technical articles are reviewed and verified for mechanical and electronic compatibility before publication.